
Web サービスで認証するにあたり、OAuth 2.0 という言葉をよく耳にするようになりました。
一方で、OAuth 2.0 を体系立てて説明している記事が少なかったり、実際にどうやって実装すれば良いのかわからなかったりしました。
そこで本記事では、以下の順で OAuth 2.0 を理解し、実装できるように執筆しました。
| SSO 関連記事 | |||
|---|---|---|---|
 |
 |
 |
 |
OAuth 2.0 とは
OAuth 2.0 のフローとロール
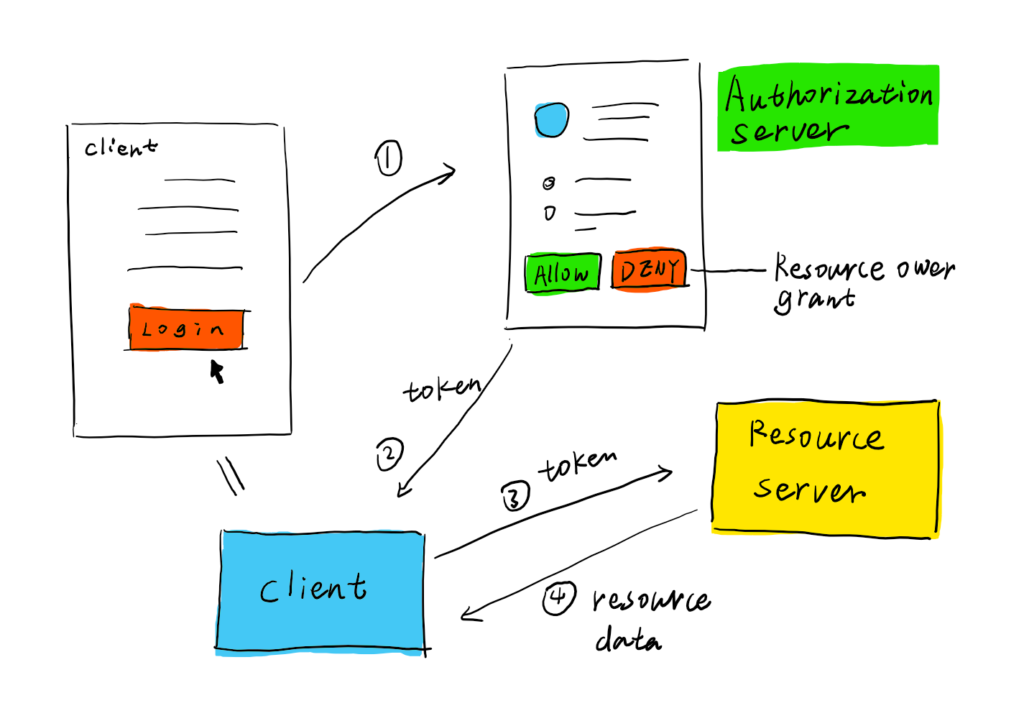
OAuth 2.0 には 4つのロール (登場人物) が存在します。
| ロール | 説明 |
|---|---|
| Resource Owner | ユーザー |
| Clinet | Resource Owner の代わりにリソースにアクセスするアプリ |
| Authorization Server | Resource Owner を認証し、Client にアクセストークンを発行 ※Client 側で認証するには OIDC が必要 |
| Resource Server | リソースを保有するサーバー。アクセストークンを検証して応答 |
OAuth 2.0 は以下のフローでアクセストークンを取得します。

https://docs.authlib.org/en/latest/oauth/2/intro.html#intro-oauth2
OAuth defines four roles:
・resource owner
・resource server
・client
・authorization serverThe interaction between the authorization server and resource server is beyond the scope of this specification.
https://tools.ietf.org/html/rfc6749#section-1.1
以降では、上記の図を常に頭の片隅に置きながら読み進めてください。
Grant Type (アクセストークンを取得する種類)
Grant Type は、以下の OAuth 2.0 のフローの①、②の動作を決定します。
Grant Type には以下の4つのタイプがあります。
| Grant Type | 用途・備考 |
|---|---|
| Client Credentials Grant | 一般的なリソースにアクセスする場合 |
| Authorization Code Grant | ユーザーリソースにアクセスする場合 ユーザーが都度同意(ログイン)したい場合 |
| Resource Owner Password Credentials Grant | 使用禁止/Client にパスワードが渡るため Authorization Code Grant でいい |
| Implicit Grant | 非推奨/アクセストークンが URL に露出するため SPA(Single Page Application で利用) |
| JWT (RFC 7523 で追加) | 推奨 ユーザーリソースにアクセスする場合 管理者が事前に同意(都度ログインしたくない) |
This specification defines four grant types -- authorization code, implicit, resource owner password credentials, and client credentials -- as well as an extensibility mechanism for defining additional types.
https://datatracker.ietf.org/doc/html/rfc6749
Client Credentials Grant
事前準備
認可サーバーにクライアントを登録すると、次の Credentials を発行されます。
- client_id:クライアント名
- client_secret:パスワード
Client Credentials Grant でアクセストークンを取得する手順
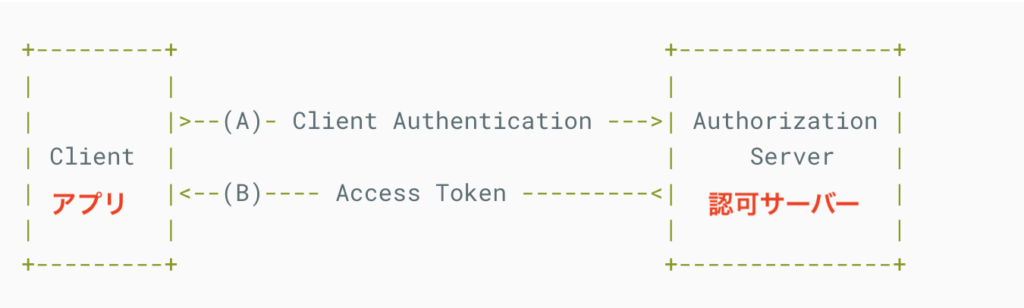
Client Authentication には Credentials を使用
- Client は Credentials で、認可サーバーにアクセストークンをリクエスト (A)
- 認可サーバーはアクセストークンを返す (B)
Authorization Code Grant
事前準備
認可サーバーにクライアント (redirect_uri) を登録すると、次の Credentials を発行されます。
- client_id:クライアント名
- client_secret:パスワード
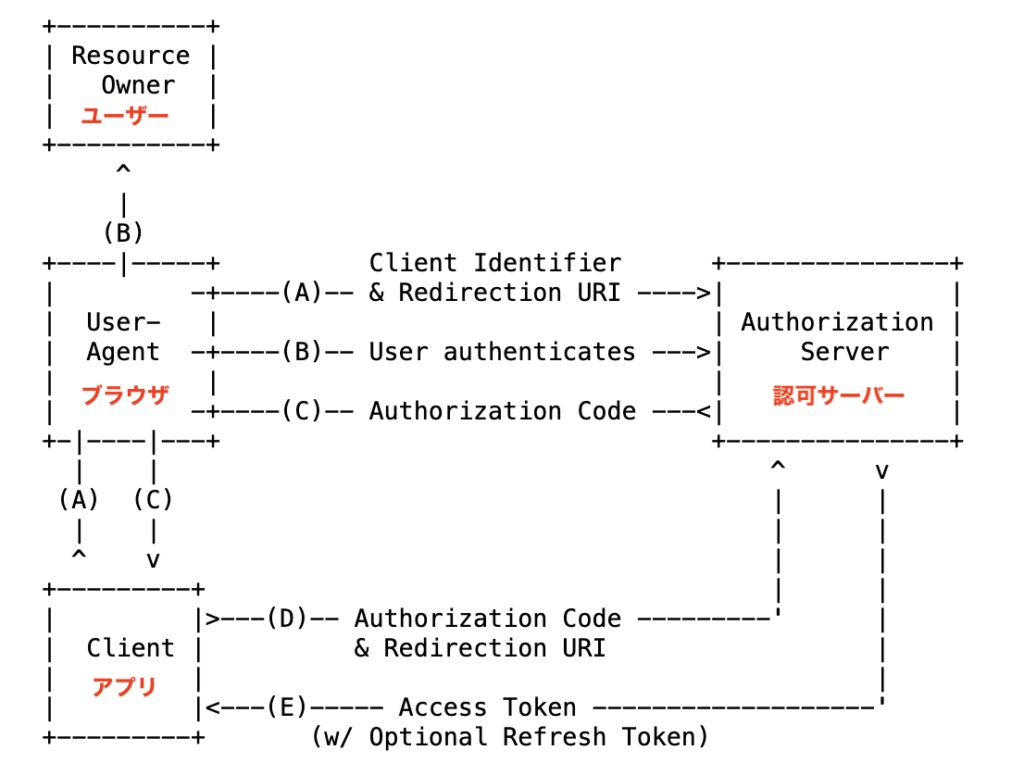
Authorization Code Grant でアクセストークンを取得する手順

- Client Identifier = どの Client か
- Redirection URI = Client の callback URI を指定 (C でクライアントにリダイレクトさせる)
- User authenticates = ユーザー名/パスワードなどで認証
- ユーザーが Client の「ログインページ」をクリックすると認可サーバーのログイン画面に遷移
- Client が URL に client_id と redirect_uri を含めてブラウザに 302 リダイレクト(A)
- ブラウザが認可サーバーにリダイレクト (A: Client Identifier & Redirection URL)
- ユーザーにリダイレクト先のログイン画面を表示 (B)
- ユーザーがユーザー名/パスワードなどで認証 (B: User authenticates)
- 認証に成功すると認可サーバーは Authorization Code を返す (C)
- アプリは認可サーバーに Authorization Code を渡し、アクセストークンをリクエスト (D)
- 認可サーバーはアクセストークンを返す (E)
C の時点でアクセストークンを直接貰わず、Authorization Code を貰うのはセキュリティの都合
(クエリパラメータはログに残ったり、Referer で外部に送られたり。そのため、client_secret + Authorization Code をアクセストークンの引換券とする。)
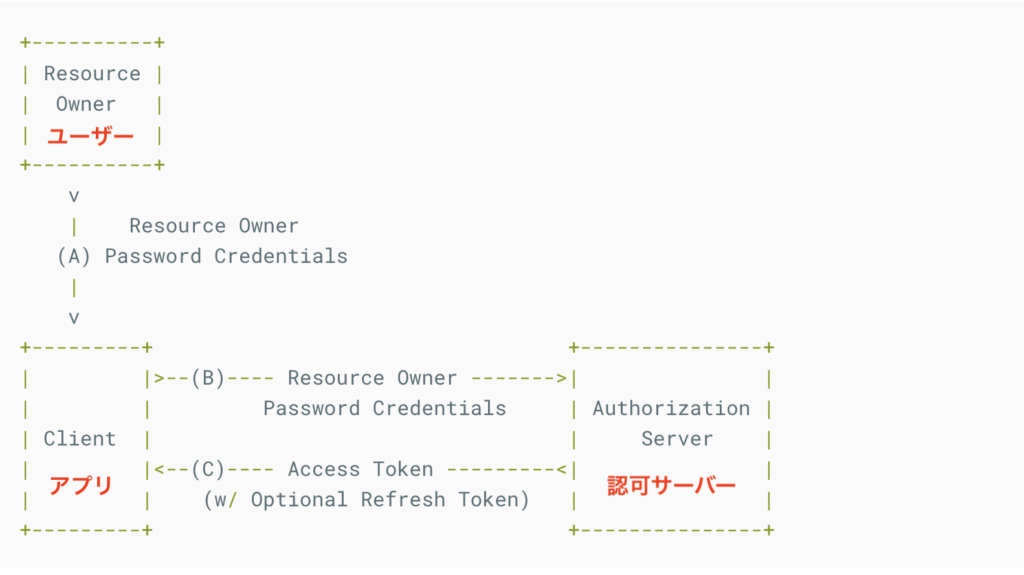
Resource Owner Password Credentials Grant
Authorization Code Grant はブラウザ経由なのに対して、Resource Owner Password Credentials Grant はクライアント経由でパスワードを認可サーバーに送ります。(クライアントのメモリにパスワードが乗るのでセキュリティ的に使用禁止になった)
Resource Owner Password Credentials Grant でアクセストークンを取得する手順は以下のとおりです。

- ユーザーが Password Credentials (パスワード) を入力する (A)
- アプリケーションは、Authorization Server に Password Credentials を渡し、アクセストークンをリクエスト (B)
- Authorization Server は、アクセストークンを返す (C)
Implicit Grant
非推奨となる見込みのため、省略します。
The implicit grant (response type "token") and other response types causing the authorization server to issue access tokens in the authorization response are vulnerable to access token leakage and access token replay as described in Section 4.1, Section 4.2, Section 4.3, and Section 4.6.
https://datatracker.ietf.org/doc/html/draft-ietf-oauth-security-topics-14
詳細を知りたい方はこのあたりを見てください。
JWT Bearer Grant
事前準備
JWT Bearer Grant でアクセストークンを取得する手順
       +---------+                                  +---------------+
       |         |                                  |               |
       |         |>---(A)-- JWT Assertion --------->| Authorization |
       |  Client |          (signed with            |     Server    |
       |  アプリ  |           private key)           |  認可サーバー   |
       |         |                                  |               |
       |         |<---(B)-- Access Token -----------|               |
       |         |                                  |               |
       +---------+                                  +---------------+
- アクセストークンの有効期限が切れると、JWT で再発行
- JWT の有効期限が切れると、クライアントでJWT を再生成
OAuth 2.0 サーバーの実装
以下の GitHub のコードを利用して、OAuth 2.0 サーバーを実装します。
なお、上記のコードでは Flask を利用してます。Flask については以下の記事をご覧ください。

実装する OAuth 2.0 サーバーは以下のとおりです。
- Authorization Server:
- Resource Server:
FlaskでOAuth 2.0 認可サーバー
これで OAuth 2.0 サーバーの構築は完了です。
Authorization Server に Client を登録
Authorization Server に Client (アプリケーション) を登録します。
まずは http://127.0.0.1:5000/ にアクセスし、Resource Owner (ログインユーザー) を登録します。
次に [Create Client] をクリックして、Client (アプリケーション) を登録します。
入力する情報は以下のとおりです。
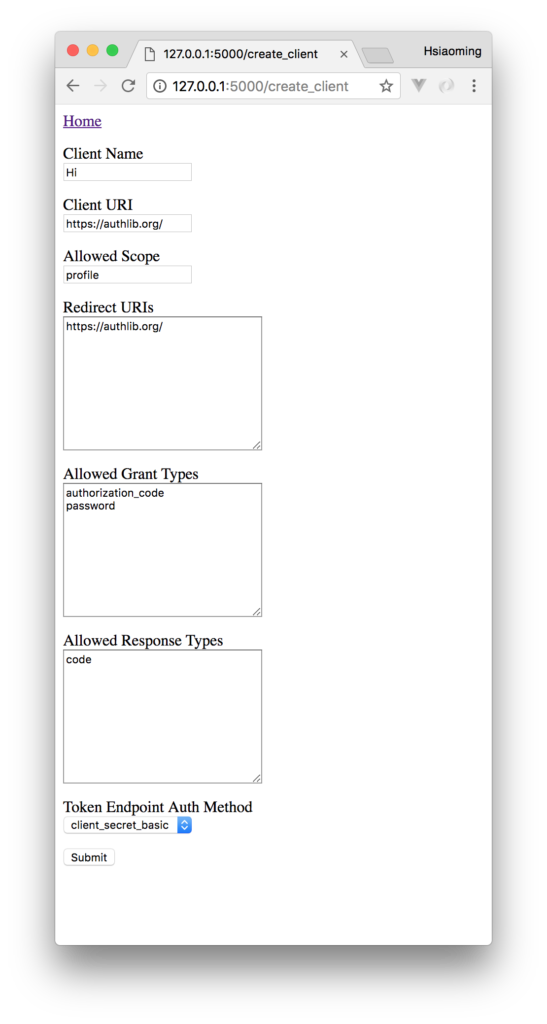
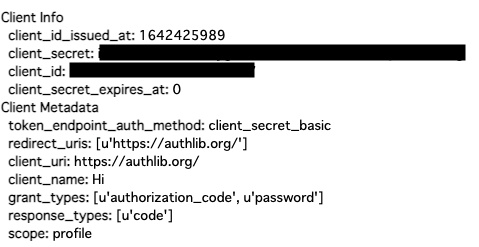
[Submit] をクリックすると、 作成した Client の情報が表示されます。
OAuth 2.0 クライアントの実装
今回は次の2つの方法で OAuth 2.0 クライアントを実装します。
curl で OAuth 2.0 を実装
curl を利用して、以下の2種類の Grant Type でアクセストークンを取得します。
Resource Owner Password Credentials Grant を利用
curl + Resource Owner Password Credentials Grant でアクセストークンを取得して、REST API を実行します。
Resource Owner = ユーザー、Client = アプリケーション
OAuth 2.0 のフローの①、②に相当
以降では、上記の図のフローに従って実際にクライアントの curl を操作します。
{"access_token": "afsdgabcdefghijklmn", "expires_in": 864000, "refresh_token": "fagshabcdefghijklmn", "scope": "profile", "token_type": "Bearer"}
curl + Resource Owner Password Credentials Grant でアクセストークンを取得できました。
アクセストークンを利用して REST API を叩く
{"id":1,"username":"test"}
アクセストークンを利用して、/api/me API が実行できたことが確認できます。
補足:アクセストークン無い時
{"error": "missing_authorization", "error_description": "Missing \"Authorization\" in headers."}
REST API の実行を許可しないことが確認できます。
Authorization Code Grant を利用
curl + Authorization Code Grant で、アクセストークンを取得して API を実行します。
Resource Owner = ユーザー、User-Agent = ブラウザ、Client = アプリケーション
1. Authorization Server (http://127.0.0.1:5000/oauth/authorize?response_type=code&client_id=${client_id}&scope=profile) にアクセス (A)
2. (User-Agent (= ブラウザ) が自動で) Authorization Server のページを表示 (B)
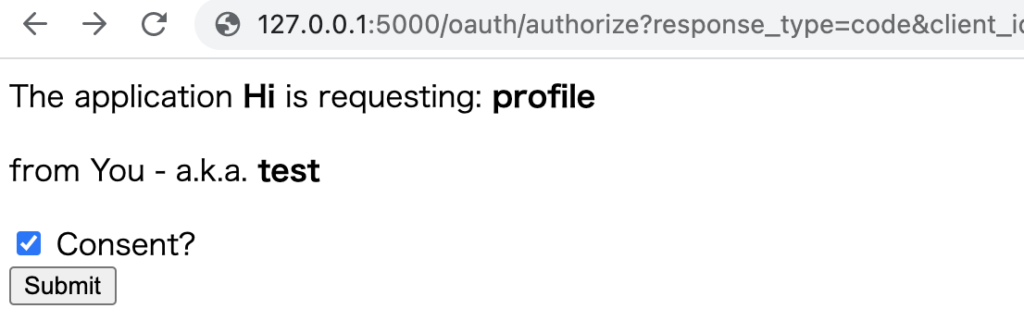
3. Consent にチェックを入れ、Submit を押下し、ブラウザが認可サーバーにリクエスト (B)
4. (User-Agent (= ブラウザ) が自動で) Authorization code を表示 (C)

{"access_token": "123456789ABCDEFGHIJK", "expires_in": 864000, "scope": "profile", "token_type": "Bearer"}
アクセストークンを利用して REST API を叩く
{"id":1,"username":"test"}
Requests (Python) で OAuth 2.0 を実装
Python の Requests ライブラリを利用して、Resource Owner Password Credentials Grant の Grant Type でアクセストークンを取得します。

Resource Owner = ユーザー、Client = アプリケーション
OAuth 2.0 のフローの①、②に相当
Resource Owner Password Credentials Grant の実装
from authlib.integrations.requests_client import OAuth2Auth
from requests.auth import HTTPBasicAuth
import requests
import json
import os

###認可サーバーからアクセストークンを取得するために、Basic (パスワード) 認証を行う
#アドレスとポート番号に注意
authorization_endpoint = 'http://localhost:5000/oauth/token' #Authorization Server
basic_auth = HTTPBasicAuth(os.environ['client_id'], os.environ['client_secret']) #環境変数をセットしてください。パスワード認証に必要な情報

form_data = { #Authorization Server に渡す情報の設定
    'grant_type': 'password',
    'username': os.environ['username'], #環境変数をセットしてください。
    'password': 'valid',
    'scope': 'profile'
}

response_authorization = requests.post(authorization_endpoint, auth=basic_auth, data=form_data) #Authorization Server から Bearer 用のアクセストークンを取得
json = json.loads(response_authorization.text) #JSON 文字列を dict に
access_token = json['access_token'] #アクセストークンを取得

###Resource Server の /api/me API を叩くために、アクセストークンを利用して、Bearer 認可を行う
#アドレスとポート番号に注意
resource_server_api = 'http://localhost:5000/api/me' #自分の id とユーザー名を表示する API
token = {'token_type': 'bearer', 'access_token': access_token} #アクセストークンをセット
auth = OAuth2Auth(token) #認可リクエストの作成
response_api = requests.get(resource_server_api, auth=auth) #bearer トークンを使って API を叩く

print (response_api.text) # API の結果
{"id":1,"username":"test"}
リソースサーバーの /api/me API を叩き、結果を取得していることが確認できます。
OAuth 2.0 のフローと Python のソースコードの対応
OAuth 2.0 のフローと、Python のソースコードの対応関係は以下のとおりです。
- ①:requests.post(authorization_endpoint, auth=basic_auth, data=form_data)
- ②:response_authorization
- ③:requests.get(api_url, auth=auth)
- ④:response_api
Resource Owner Password Credentials Grant と Python の対応
Resource Owner Password Credentials Grant と Python ソースコードの対応関係は以下のとおりです。

Resource Owner = ユーザー、Client = アプリケーション
OAuth 2.0 のフローの①、②に相当
- (A):${client_id}:${client_secret} をユーザーが入力している時
- (B):requests.post(authorization_endpoint, auth=basic_auth, data=form_data)
- (C):response_authorization
関連記事
SSO (シングルサインオン) 入門記事の続きは以下のとおりです。
- 【SSO (シングルサインオン) 入門1】ID フェデレーションとは
- 【SSO (シングルサインオン) 入門2】OAuth 2.0 とは ←イマココ
- 【SSO (シングルサインオン) 入門3】OpenID Connect (OIDC) とは
- 【SSO (シングルサインオン) 入門4】Keycloak で SSO を実装
参考資料
https://datatracker.ietf.org/doc/html/rfc6749