
Elasticsearch とは、データを検索する検索エンジンです。
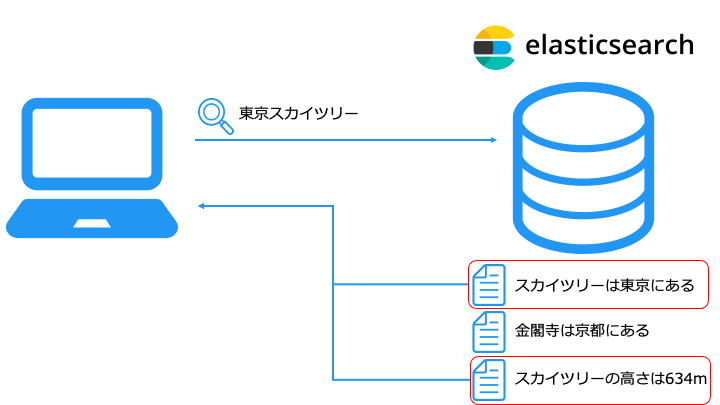
以下のようにウェブサイトの商品検索や、github のソースコード検索のような検索ができます。
| 企業 | 事例 |
|---|---|
| ZOZOTOWN | 商品検索 |
| GitHub, Inc. | ソースコード検索 |
| 日経新聞 | 記事検索、アクセスログ検索 |
| RICOH | 異常検知 |
| Netflix | ログイベントの検索、デプロイのトラッキング |
また、Elasticsearch 用の可視化ソフトウェアである Kibana でデータの可視化もできます。
| Elasticsearch & OpenSearch の使い方 | ||||
|---|---|---|---|---|


| 学習ロードマップ | |||||
|---|---|---|---|---|---|


![Elastic Stack実践ガイド[Elasticsearch/Kibana編] impress top gearシリーズ](https://m.media-amazon.com/images/I/51ieij7UhAL._SL160_.jpg)


検索の種類
データを検索する方法は、主に「全文検索」と「セマンティック検索」があります。
全文検索とは
全文検索を実現する方法として、主に次の2種類が存在します。
UNIX の grep コマンドは、こちらに相当します。
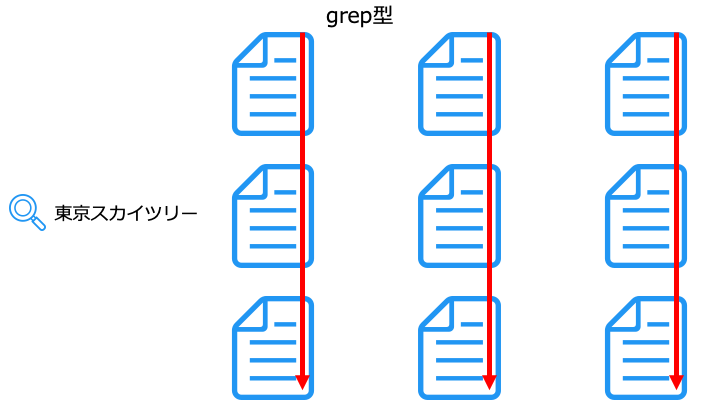
grep 型は、ファイルの数が増えると検索速度が大幅に低下する特徴があります。
Elasticsearch の全文検索は、こちらに相当します。
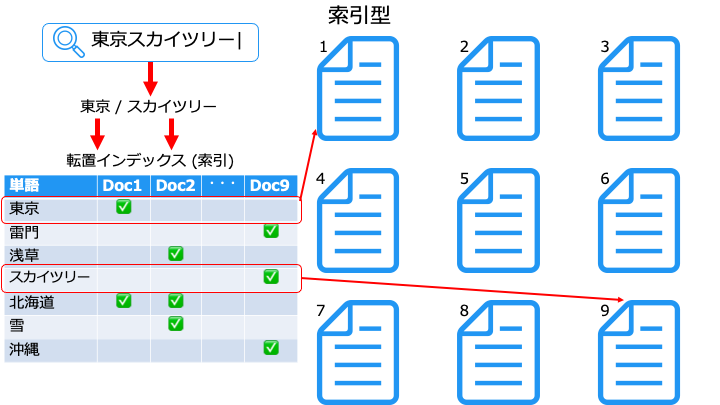
索引型は、不要なファイルをスキャンしないので、高速に検索できます。
※索引 (転置インデックス) の作成方法は (こちら1 もしくは こちら2)
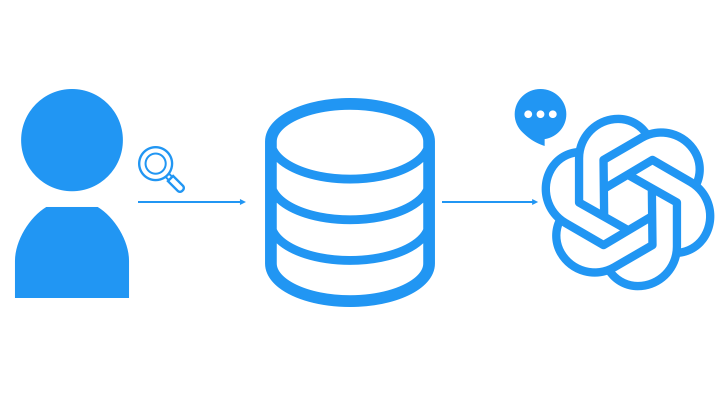
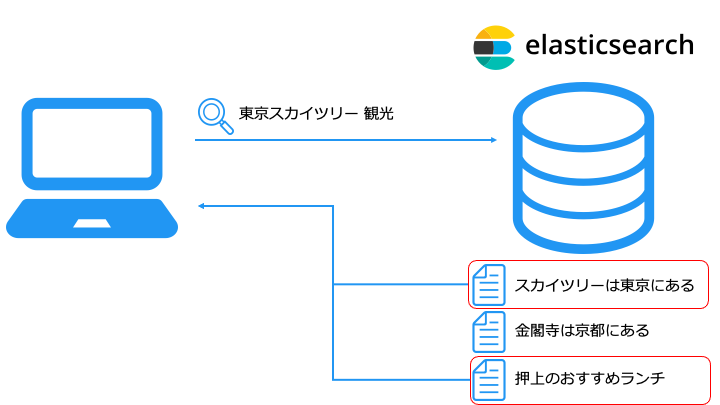
セマンティック検索とは
例えば、「東京スカイツリー 観光」と検索すると、近場のランチの場所もヒットします。
ベクトルデータベースを利用したベクトル検索の詳細は、以下の記事をご覧ください。


Elasticsearch のアーキテクチャ
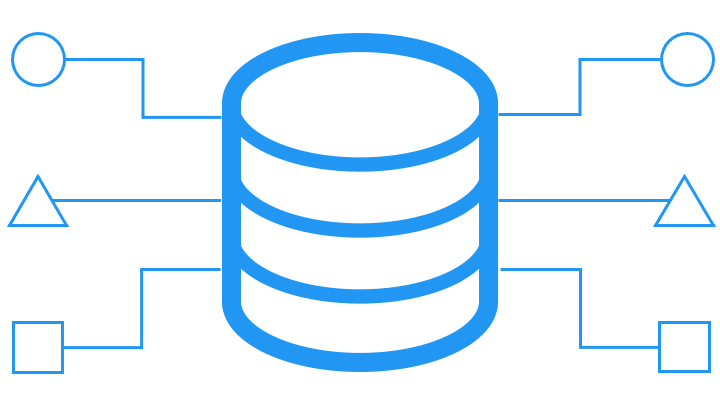
Elasticsearch では、データを以下のように JSON 形式で持ちます。

Elasticsearch の用語
Elasticsearch は、ドキュメントを以下のように配置します。

ノードには、主に次の4種類が存在します。
| ノードの種類 | 役割 |
|---|---|
| マスターノード | クラスターのメタデータなどを管理するノード ・マスターノードはクラスターに 1 台のみ ・それ以外は、マスター候補ノードと呼ぶ ・マスター候補ノードが昇格するとマスターノードになる |
| データノード | データを格納・リクエストの処理 (検索や集計などを) するノード |
| Ingest ノード | データの変換や加工をして、データノードに格納するノード |
| Coordinating ノード | リクエストを適切なデータノード※にルーティングするノード |
1つのノードに複数の役割を割り当てることも可能。ノードの役割一覧はこちら
最初はデータノードで全ての役割兼任し、スペックが足りなくなった時点で専属の役割を持つノードを追加すると良い
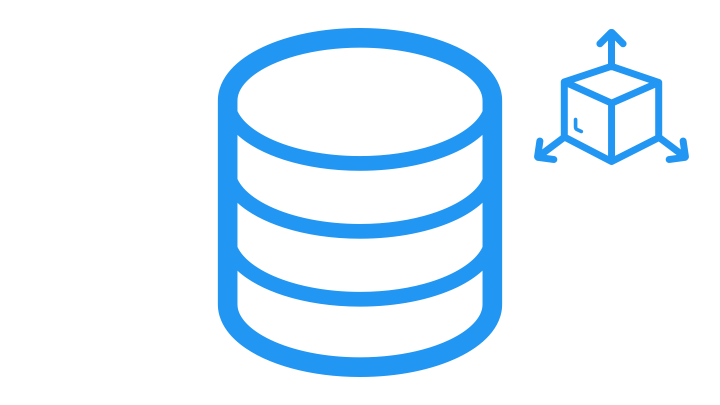
一般的に、インデックスはログの種類や、日/週/月ごとに分けます。
シャードの種類には、以下の2種類が存在します。
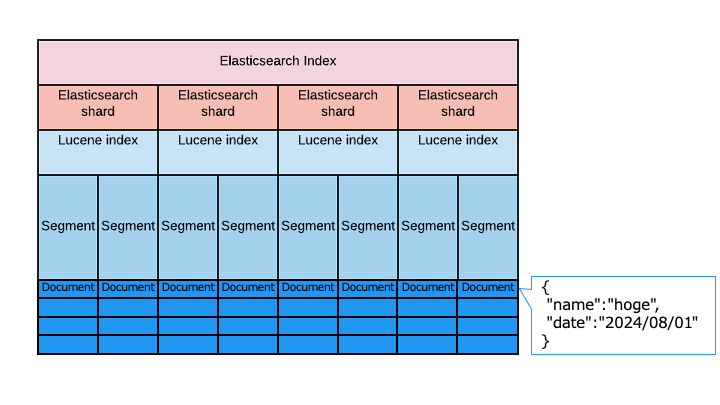
Elasticsearch の実体
Elasticsearch は、Apache Lucene がベースとなっており、実体は以下のとおりです。
![[増補改訂]ビッグデータを支える技術 ——ラップトップ1台で学ぶデータ基盤のしくみ WEB+DB PRESS plus](https://m.media-amazon.com/images/I/51V-rBEb0PL._SL160_.jpg)

![Elastic Stack実践ガイド[Logstash/Beats編] impress top gearシリーズ](https://m.media-amazon.com/images/I/51UyZjgKQML._SL160_.jpg)

Elasticsearch のインストール
Docker を使った Elasticsearch のインストール方法を紹介します。
Docker を使わないインストール方法はこちら
ここでは Amazon Linux 2 でインストールする方法を紹介します。
その他の OS については以下のドキュメントをご覧ください。
■Elasticsearch のインストール
Kibana のインストール
Java のインストール
Elasticsearch を実行するには Java 8 が必要なので、まずは Java 8 をインストールします。
openjdk version "1.8.0_252"
OpenJDK Runtime Environment (build 1.8.0_252-b09)
OpenJDK 64-Bit Server VM (build 25.252-b09, mixed mode)
openjdk version "1.8****" 以上であれば OK です。
Elasticsearch のインストール
次に Elasticsearch をインストールします。
[elasticsearch]
name=Elasticsearch repository for 7.x packages
baseurl=https://artifacts.elastic.co/packages/7.x/yum
gpgcheck=1
gpgkey=https://artifacts.elastic.co/GPG-KEY-elasticsearch
enabled=0
autorefresh=1
type=rpm-md
{
  "name" : "***",
  "cluster_name" : "elasticsearch",
  "cluster_uuid" : "***",
  "version" : {
    "number" : "7.10.0",
    "build_flavor" : "default",
    "build_type" : "rpm",
    "build_hash" : "***",
    "build_date" : "2020-11-09T21:30:33.964949Z",
    "build_snapshot" : false,
    "lucene_version" : "8.7.0",
    "minimum_wire_compatibility_version" : "6.8.0",
    "minimum_index_compatibility_version" : "6.0.0-beta1"
  },
  "tagline" : "You Know, for Search"
}
Kibana のインストール
Kibana をインストールします。
[kibana-7.x]
name=Kibana repository for 7.x packages
baseurl=https://artifacts.elastic.co/packages/7.x/yum
gpgcheck=1
gpgkey=https://artifacts.elastic.co/GPG-KEY-elasticsearch
enabled=1
autorefresh=1
type=rpm-md
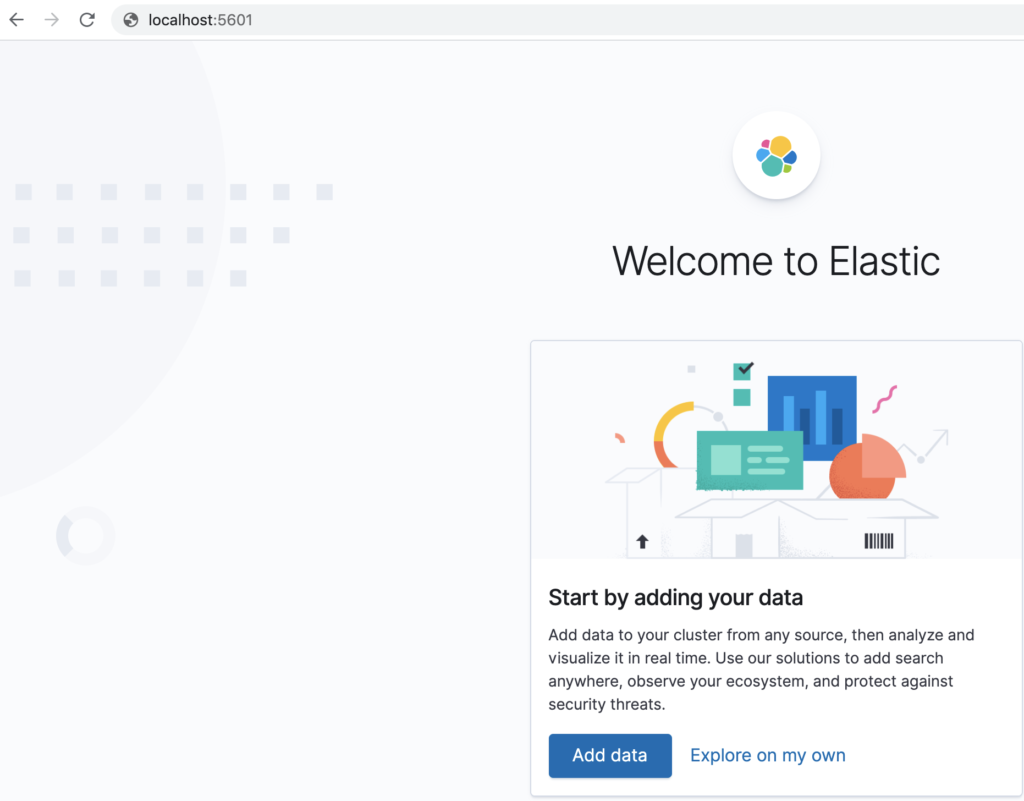
ブラウザから Kibana(localhost:5601) にアクセスします。
以下のページが表示されれば成功です。(この記事は Kibana バージョン 7.10.0です)
アクセスできない場合

docker コンテナを作成
version: '3'
services:
  elasticsearch:
    image: elasticsearch:7.12.1
    container_name: elasticsearch
    environment:
      - discovery.type=single-node
    ports:
      - 9200:9200
  kibana:
    image: kibana:7.12.1
    ports:
      - "5601:5601"
    environment:
      - ELASTICSEARCH_HOSTS=http://elasticsearch:9200
これでシングルノードの Elasticsearch コンテナが立ち上がります。
Elasticsearch にアクセス
{
  "name" : "123456789abc",
  "cluster_name" : "docker-cluster",
  "cluster_uuid" : "1234567890abcdefghijkl",
  "version" : {
    "number" : "7.12.1",
    "build_flavor" : "default",
    "build_type" : "docker",
    "build_hash" : "1234567891456789123456789",
    "build_date" : "2021-04-20T20:56:39.040728659Z",
    "build_snapshot" : false,
    "lucene_version" : "8.8.0",
    "minimum_wire_compatibility_version" : "6.8.0",
    "minimum_index_compatibility_version" : "6.0.0-beta1"
  },
  "tagline" : "You Know, for Search"
}
起動に成功している場合は、上記のような結果が返ってきます。
※ 「curl: (56) Recv failure: Connection reset by peer」が返ってくる場合は初期化処理が完了するまでお待ちください。
Kibana にアクセス
Kibana コンテナにアクセスするために、ブラウザで http://localhost:5601 を開きます。
Kibana は、Dev Tools を使うことで、REST API 経由で Elasticsearch を操作できます。
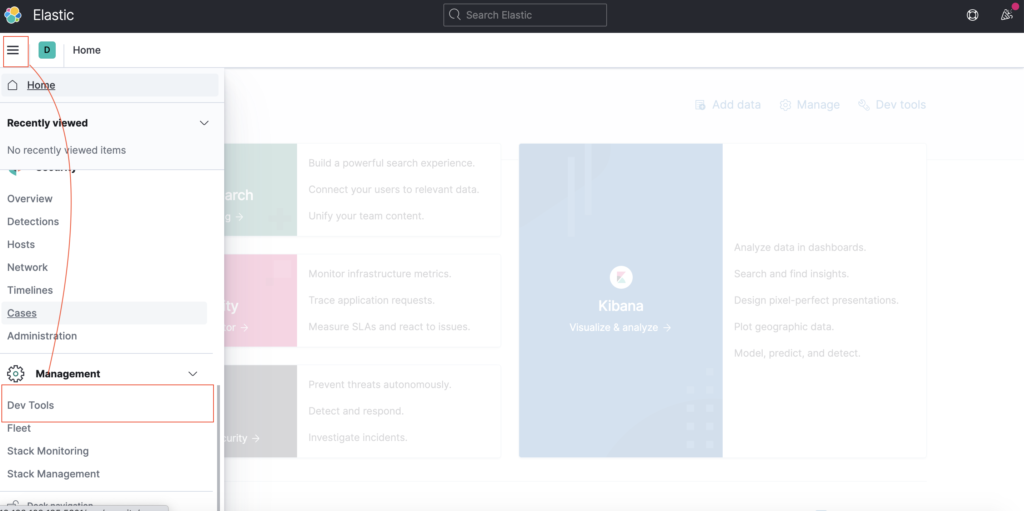
以降では、Dev Tools で REST API を実行し、Elasticsearch を操作する方法を解説します。


REST API の使い方 (操作方法)
Elasticsearch は REST API を利用してデータを操作します。
CRUD 操作
まずは、基本操作である CRUD 操作 (読み書き更新削除) を紹介します。
| REST API | 説明 | 対応する CRUD |
|---|---|---|
| Index API | インデックスにドキュメントを追加 | Create |
| Get API | インデックスのドキュメントを取得 | Read |
| Index API Update API | インデックスのドキュメントを更新 | Update |
| Delete API | インデックスのドキュメントを削除 | Delete |
PUT /<インデックス名>/_doc/<ドキュメント ID>
{
 "フィールドのキー":"フィールドの値"
}
PUT /test/_doc/1
{
  "date":"2020-11-01T12:10:30+0900",
  "Tweet":"ツイッターをはじめました。",
  "User ID":"hoge"
}
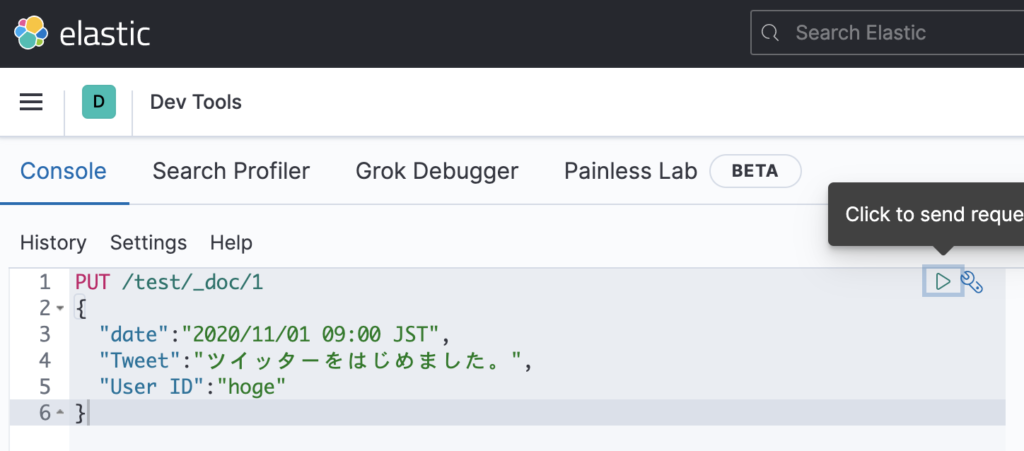
右上の三角ボタンで実行します。
補足 データストリームへドキュメントを追加する場合
データストリームとは、複数のインデックスを1つにまとめたものです。
データストリームの詳細は以下のドキュメントに記載がございます。
データストリームにドキュメントを追加するためには、以下の REST API を利用します。
PUT /tweet/_create/1
{
  "date":"2020-11-01T12:10:30+0900",
  "Tweet":"ツイッターをはじめました。",
  "User ID":"hoge"
}
GET /<インデックス名>/_doc/<ドキュメントID>
{
  (中略)
  "_source" : {
    "date" : "2020-11-01T12:10:30+0900",
    "Tweet" : "ツイッターをはじめました。",
    "User ID" : "hoge"
  }
}
なお、インデックス作成で利用した Index API でも更新可能です。
| Update API | Index API | |
|---|---|---|
| 説明 | スクリプトでフィールドを上書き | 既にドキュメントがある場合は上書き |
| 用途 | 一部のフィールドだけ更新したい時 更新処理を自分で書きたい時 | ドキュメントを上書きしたい時 |
一部のフィールドを更新
POST /<インデックス名>/_update/<ドキュメント ID>
{
  "doc": {
    "更新するフィールドのキー":"値"
  }
}
具体的な使用例は、以下のとおりです。
POST /test/_update/1
{
  "doc": {
    "Tweet":"フィールドを更新したよ。"
  }
}
  "_version" : 2
  "_source" : {
    "date" : "2020-11-01T12:10:30+0900",
    "Tweet" : "フィールドを更新したよ。",
    "User ID" : "hoge"
  }
"Tweet" フィールドの値が更新され、_version が 2 に変化していることがわかります。
全てのフィールドを更新 (ドキュメントの上書き)
PUT /<インデックス名>/_doc/<ドキュメント ID>
{
 "フィールドのキー":"フィールドの値"
}
具体的な使用例は、以下のとおりです。
PUT /test/_doc/1
{
  "Tweet":"ドキュメントを置き換えたよ"
}
  "_version" : 3,
  "_source" : {
    "Tweet" : "ドキュメントを置き換えたよ"
  }
以下の3つが確認できます。
- Tweet フィールドが上書き
- date, User ID フィールドが消える (上書きしたドキュメントに存在しないので)
- _version が 3 に変化
{
  "date":"2020-11-01T12:10:30+0900",
  "Tweet":"ドキュメントを更新したよ。",
  "User ID":"hoge"
}'
{
(中略)
  "_version" : 2,
  "_source" : {
    "date" : "2020/11/01 09:00 JST",
    "Tweet" : "ドキュメントを更新したよ。",
    "User ID" : "hoge"
  }
"Tweet" フィールドの値が更新され、_version が2に変化していることがわかります。
POST <index>/_update/<_id> を使う場合
POST /test/_update/1
{
  "doc": {
    "Tweet":"ドキュメントを一部更新したよ。"
  }
}
{
(中略)
  "_source" : {
    "date" : "2020-11-01T12:10:30+0900",
    "Tweet" : "ドキュメントを一部更新したよ。",
    "User ID" : "hoge"
  }
DELETE /<インデックス名>/_doc/<ドキュメント ID>
{
  "_index" : "test",
  "_type" : "_doc",
  "_id" : "1",
  "found" : false
}
found" が false となりました。("_source" のフィールドが削除されました。)
POST /_bulk
{ "アクション名" : { "_index" : "インデックス名", "_id" : "ドキュメント ID" } }
{ "アクション名" : { "_index" : "インデックス名", "_id" : "ドキュメント ID" } }
Bulk API では、1回のリクエストで今まで紹介した CRUD 処理を複数回実行できます。
POST /_bulk
{ "index" : { "_index" : "test", "_id" : "1" } }
{ "フィールド名" : "フィールドの値を置き換え" }
{ "delete" : { "_index" : "test", "_id" : "2" } }
{ "create" : { "_index" : "test", "_id" : "3" } }
{ "フィールド名" : "フィールドの値を作成" }
{ "update" : { "_index" : "test", "_id" : "3" } }
{ "doc" : {"フィールドのキー" : "フィールドの値を更新"} }
| アクション名 | 説明 | クエリの 2 行目 |
|---|---|---|
| Create | インデックスが存在しない場合、ドキュメントを作成 | フィールド名が必要 |
| Index | インデックスのドキュメントを全て更新 (置き換え) | フィールド名が必要 |
| Update | インデックスのドキュメントを一部更新 | doc が必要 |
| Delete | インデックスのドキュメントを削除 | 不要 |
GET /test/_search
      {
        "_index": "test",
        "_id": "3",
        "_score": 1,
        "_source": {
          "フィールドのキー": "フィールドの値を更新"
        }
      },
      {
        "_index": "test",
        "_id": "1",
        "_score": 1,
        "_source": {
          "フィールドのキー": "フィールドの値を置き換え"
        }
      }
なお、GET test/_search の意味は、この下で解説します。
Bulk API で操作する内容を記載した json ファイルを作成します。
{ "index" : { "_index" : "test", "_id" : "1" } }
{ "field1" : "value1" }
{ "delete" : { "_index" : "test", "_id" : "2" } }
{ "create" : { "_index" : "test", "_id" : "3" } }
{ "field1" : "value3" }
{ "update" : {"_id" : "1", "_index" : "test"} }
{ "doc" : {"field2" : "value2"} }


検索クエリ
Elasticsearch では、search API を利用してインデックスにあるドキュメントを検索します。
search API でよく利用するクエリグループは、次の 4 つです。
| クエリグループ | クエリ | 説明 |
|---|---|---|
| Full text | match, match_phrase | 全文検索。(転置インデックスで検索) |
| Term-level | term, terms, wildcard, range | 完全一致検索 (転置インデックスは使わない) |
| Compound | bool | 複合検索 (他のクエリを組み合わせる) |
| Vector | knn (こちらの記事で解説) | セマンティック検索 (ベクトル検索) |
今回は、以下のデータを使用して、search API を解説します。
POST /_bulk
{ "index" : { "_index" : "demo_search", "_id" : "1" } }
{ "text" : "This is Elasticsearch test.", "num" : 1 }
{ "index" : { "_index" : "demo_search", "_id" : "2" } }
{ "text" : "Elasticsearch is search engine.", "num" : 2 }
{ "index" : { "_index" : "demo_search", "_id" : "3" } }
{ "text" : "This is a pen.", "num" : 3 }
クエリなし (条件なし検索)
まずは、検索条件を指定せずに search API でドキュメントを検索してみます。
    "hits" : [
      {
        "_index" : "demo_search",
        "_type" : "_doc",
        "_id" : "1",
        "_score" : 1.0,
        "_source" : {
          "text" : "This is Elasticsearch test.",
          "num" : 1
        }
      },
      {
        "_index" : "demo_search",
        "_type" : "_doc",
        "_id" : "2",
        "_score" : 1.0,
        "_source" : {
          "text" : "Elasticsearch is search engine.",
          "num" : 2
        }
      },
      {
        "_index" : "demo_search",
        "_type" : "_doc",
        "_id" : "3",
        "_score" : 1.0,
        "_source" : {
          "text" : "This is a pen.",
          "num" : 3
        }
      }
    ]
作成した3つのドキュメントがすべて検索できています。
Full text (全文検索)
Full text クエリは、転置インデックスで全文検索を行います。
そのため、検索するフィールドには、転置インデックスを利用可能な text 型を主に使います。
Full text クエリとして、match と match_phrase クエリを紹介します。
GET /demo_search/_search
{
  "query":{
    "match": {
      "text" : "engine"
    }
  }
}
(中略)
        "_source": {
          "text": "Elasticsearch is search engine."
「engine」を含むドキュメントが検索できました。
また、match クエリでは、AND 検索や OR 検索もできます。
GET /demo_search/_search
{
  "query":{
    "match": {
      "text": {
        "query": "Elasticsearch engine",
        "operator":"AND"
      }
    }
  }
}
(中略)
        "_source" : {
          "text" : "Elasticsearch is search engine."
[Elasticsearch] と [engine] の両方を含むドキュメントが検索できました。
GET /demo_search/_search
{
  "query":{
    "match_phrase": {
      "text": "Elasticsearch test"
    }
  }
}
    "hits" : [
        (省略)
        "_source" : {
          "text" : "This is Elasticsearch test."
        }
      }
語順が「Elasticsearch test」であるドキュメントを検索できました。
クエリの語順が一致しない場合
GET /demo_search/_search
{
  "query":{
    "match_phrase": {
      "text":{
        "query": "test Elasticsearch"
      }
    }
  }
}
"hits" : [ ]
語順が違うのでヒットしないことが確認できます。
Term-level (完全一致検索)
Term-level クエリは、完全一致検索を行います。
そのため、転置インデックスではなく、そのまま内容を格納した keyword 型を主に使います。
Term-level クエリとして、term, terms, wildcard, range クエリを紹介します。
GET /demo_search/_search
{
  "query":{
    "term": {
      "text.keyword": "This is Elasticsearch test."
    }
  }
}
        "_source" : {
          "text" : "This is Elasticsearch test."
完全一致しているドキュメントが検索できました。
match クエリとの違い
term は完全一致検索なので、単語一致で検索できません。(match を使ってください。)
GET /demo_search/_search
{
  "query":{
    "term": {
      "text.keyword": "Elasticsearch"
    }
  }
}
"hits" : [ ]
"Elasticsearch" は "This is Elasticsearch test." と完全一致でないので検索にヒットしない。
単語検索をしたい場合は、match クエリを利用しましょう。
GET /demo_search/_search
{
  "query":{
    "match": {
      "text": "Elasticsearch"
    }
  }
}
      {
        "_index": "demo_search",
        "_id": "2",
        "_score": 0.2876821,
        "_source": {
          "text": "Elasticsearch is search engine.",
          "num": 2
        }
      },
      {
        "_index": "demo_search",
        "_id": "1",
        "_score": 0.2876821,
        "_source": {
          "text": "This is Elasticsearch test.",
          "num": 1
        }
      }
GET /demo_search/_search
{
  "query":{
    "terms": {
      "text.keyword":["This is Elasticsearch test.","This is a pen."]
    }
  }
}
"_source" : {
          "text" : "This is Elasticsearch test."
        }
        (中略)
        "_source" : {
          "text" : "This is a pen."
        }
GET /demo_search/_search
{
  "query":{
    "wildcard": {
      "text" : "eng*"
    }
  }
}
        "_source": {
          "text": "Elasticsearch is search engine.",
          "num": 2
        }
GET /demo_search/_search
{
  "query":{
    "range": {
      "num":{
        "gte": "1",
        "lte": "2"
      }
    }
  }
}
    "hits" : [
      {
        "_index" : "demo_search",
        "_type" : "_doc",
        "_id" : "1",
        "_score" : 1.0,
        "_source" : {
          "text" : "This is Elasticsearch test.",
          "num" : 1
        }
      },
      {
        "_index" : "demo_search",
        "_type" : "_doc",
        "_id" : "2",
        "_score" : 1.0,
        "_source" : {
          "text" : "Elasticsearch is search engine.",
          "num" : 2
        }
      }
num フィールドの値が1以上、2以下のドキュメントを検索できました。
Compound (複合検索)
Compound クエリは、今まで紹介したような他のクエリを組み合わせることができます。
Compound クエリとして、bool クエリを紹介します。
bool クエリには、以下の4種類のクエリが存在します。
| bool クエリの種類 | 説明 |
|---|---|
| must クエリ | AND 条件 |
| should クエリ | OR 条件 |
| must_not クエリ | NOT 条件 |
| filter クエリ | フィルタリング |
GET /demo_search/_search
{
  "query":{
    "bool": {
      "must":[
        {"match":{"text":"Elasticsearch"}},
        {"range":{"num":{"lte":"1"}}}
      ]
    }
  }
}
        "_source" : {
          "text" : "This is Elasticsearch test.",
          "num" : 1
        }
「text = "Elasticsearch" を含む」AND「num = 1以下」のドキュメントを検索できています。
GET /demo_search/_search
{
  "query":{
    "bool": {
      "should":[
        {"match":{"text":"engine"}},
        {"range":{"num":{"gte":"2"}}}
      ]
    }
  }
}
      {
        "_index": "demo_search",
        "_id": "2",
        "_score": 1.287682,
        "_source": {
          "text": "Elasticsearch is search engine.",
          "num": 2
        }
      },
      {
        "_index": "demo_search",
        "_id": "3",
        "_score": 1,
        "_source": {
          "text": "This is a pen.",
          "num": 3
        }
      }
「text = "engine" を含む」OR「num = 2以上」のドキュメントを検索できています。
なお、両方の条件を満たすドキュメントのほうが "_score" の値が高くなります。
GET /demo_search/_search
{
  "query":{
    "bool": {
      "must_not":[
        {"match":{"text":"Elasticsearch"}}
      ]
    }
  }
}
"hits" : [
{
"_index" : "demo_search",
"_type" : "_doc",
"_id" : "3",
"_score" : 0.0,
"_source" : {
"text" : "This is a pen.",
"num" : 3
}
}
[Elasticsearch] を含まないドキュメントが検索できました。
match と全く一致してないので、当然 "_score" は 0 のドキュメントです。
GET /demo_search/_search
{
  "query":{
    "bool": {
      "must": [
        {"match":{"text":"Elasticsearch"}}
      ],
      "filter":[
        {"range":{"num":{"lte":"1"}}}
      ]
    }
  }
}
"_source" : {
"text" : "This is Elasticsearch test.",
"num" : 1
}
[Elasticsearch is search engine.] は match 条件に一致しますが、"num" = 2 のため、検索結果から除外されています。


検索結果を集計 (Aggregations)
検索クエリ (search API) は、検索結果を集計できます。
集計 (Aggregations) には、主に次の 3 種類が存在します。
以下の "demo_agg" インデックスを利用して、Aggregations の動きを確認します。
POST /_bulk
{ "index" : { "_index" : "demo_agg", "_id" : "1" } }
{ "text" : "This is Elasticsearch test.", "num" : 1 }
{ "index" : { "_index" : "demo_agg", "_id" : "2" } }
{ "text" : "Elasticsearch is search engine.", "num" : 2 }
{ "index" : { "_index" : "demo_agg", "_id" : "3" } }
{ "text" : "This is a pen.", "num" : 3 }
Metrics aggregations では、以下のような集計ができます。
| Metrics aggregations の種類 | 説明 |
|---|---|
| Avg aggregation | 平均を取得する |
| Sum aggregation | 合計値を取得する |
| Max aggregation | 最大値を取得する |
| Min aggregation | 最小値を取得する |
| Stats aggregation | 上記全部の値を取得する |
| Cardinary aggregation | 異なる値の数を取得する ※[1,2,3,2]の場合は1,2,3 の3種類 |
ここでは、Avg aggregation を利用してみます。
GET demo_agg/_search
{
  "size": 0,
  "aggs": {
    "集計の名前": {
      "avg": {
        "field":"num"
      }
    }
  }
}
"aggregations" : {
"集計の名前" : {
"value" : 2.0
}
}
"num" フィールドの値は [1, 2, 3, 2] なので、平均の 2.0 を正しく計算できています。
Buckets aggregations では、以下のような分類ができます。
| Buckets aggregations の種類 | 説明 |
|---|---|
| Range aggregation | 指定した範囲ごとにバケットを作成 (0~99円, 100~1000円 等) |
| Histogram aggregation | 指定した等間隔でバケットを作成 (100円ごと等) |
| IP range aggregation | IP アドレスの範囲ごとにバケットを作成 (192.168.0.0/24, 192.168.1.0/24 ごと等) |
| Geo-distance aggregation | 距離ごとにバケットを作成 (指定した位置から 99km まで、100km~300km 等) |
ここでは、Range aggregation と Histogram aggregation を利用してみます。
GET demo_agg/_search
{
  "size": 0,
  "aggs": {
    "バケットの名前": {
      "range": {
        "field":"num",
        "ranges": [
          {
            "from": 0,
            "to":2
          },
          {
            "from": 2
          }
        ]
      }
    }
  }
}
  "aggregations" : {
    "バケットの名前" : {
      "buckets" : [
        {
          "key" : "0.0-2.0",
          "from" : 0.0,
          "to" : 2.0,
          "doc_count" : 1
        },
        {
          "key" : "2.0-*",
          "from" : 2.0,
          "doc_count" : 3
        }
      ]
    }
次の結果が確認できます。
- num の値が [0 以上 ~ 2 未満] を格納するバケットに、1つのドキュメント (num = [1])
- num の値が [2 以上] を格納するバケットに、3つのドキュメント (num = [2, 3, 2])
GET demo_agg/_search
{
  "size": 0,
  "aggs": {
    "バケットの名前": {
      "histogram": {
        "field":"num",
        "interval": 1
      }
    }
  }
}
  "aggregations" : {
    "バケットの名前" : {
      "buckets" : [
        {
          "key" : 1.0,
          "doc_count" : 1
        },
        {
          "key" : 2.0,
          "doc_count" : 2
        },
        {
          "key" : 3.0,
          "doc_count" : 1
        }
      ]
num の値が 1 ごとにバケットが作成されていることがわかります。
POST /demo_agg/_search
{
  "size": 0,
  "aggs": {
    "1段目の名前": {
      "range": {
        "field": "num",
        "ranges": [
          {
            "from": 1,
            "to":2
          },
          {
            "from": 2
          }
        ]
      },
      "aggs": {
        "2段目の名前": {
          "sum": {
            "field": "num"
          }
        }
      }
    }
  }
}
    "1段目の名前": {
      "buckets": [
        {
          "key": "1.0-2.0",
          "from": 1,
          "to": 2,
          "doc_count": 1,
          "2段目の名前": {
            "value": 1
          }
        },
        {
          "key": "2.0-*",
          "from": 2,
          "doc_count": 2,
          "2段目の名前": {
            "value": 5
以下のように 1 段目のバケットの内容を使って、2 段目で処理できています。
- 1段目の Range Aggregation で、[0 以上 ~ 1未満] と [2 以上] の 2 つのバケットを作成
- 2段目の Sum Aggregation で、1 段目のバケットの合計をそれぞれ計算
※[0 以上 ~ 1未満] は 1, [2 以上] は 2 +3 = 5
関連記事
| Elasticsearch & OpenSearch の使い方 | ||||
|---|---|---|---|---|
| RAG (検索拡張生成) | |||
|---|---|---|---|
 KNN
KNN| 学習ロードマップ | |||||
|---|---|---|---|---|---|
参考文献
公式ドキュメント